The Ultimate Guide to Campervan Electrical Hook Up (EHU) in the UK
Right, let's talk about one of the less glamorous but absolutely essential bits of your campervan build: the Electrical Hook Up, or EHU. Forget the romantic notions of off-grid wilderness camping for a moment. When you pull into a campsite, or even just want to charge your van at home, having a solid, safe, and reliable EHU system makes life infinitely easier. It’s the difference between a cold brew and a proper cuppa, between a flat phone and a fully charged laptop, or even between a chilly night and a warm electric heater.
For any UK campervan owner, understanding EHU isn't just about convenience; it's about safety and compliance. Campsites across the UK offer 230V AC mains power, just like in your house. Tapping into that power safely requires the right components, correctly installed. This guide will walk you through everything you need to know, from the individual parts to installation considerations, safety, and even that handy little adapter that lets you plug your van into a domestic socket.
What Exactly is Electrical Hook Up (EHU)?
In simple terms, EHU allows you to connect your campervan to an external 230V AC mains electricity supply. This supply typically comes from a dedicated hook-up post at a campsite, a marina, or even a domestic socket at home. When connected, your van receives mains power, bypassing your 12V leisure battery system for certain appliances and often charging your batteries simultaneously.
Think of it as bringing your home's electrical system into your van. You get power for standard 3-pin UK sockets, allowing you to run kettles, microwaves, hair dryers, laptops, and even charge your leisure batteries more efficiently than a solar panel ever could on a cloudy British day. This isn't about running an inverter from your 12V system; this is about direct, potent mains power. It’s a game-changer for comfort and convenience, especially on longer trips or during colder months.
The Core Components of Your EHU System
Building a robust EHU system means understanding its key parts. Each component plays a vital role in getting power from the campsite post into your van safely and efficiently. Skimping on quality or understanding here is a definite no-no.
1. The External Inlet Socket
This is the first point of contact for external power. It's the blue socket mounted on the outside of your van, usually near the rear or side.
What to Look For:
- Standard: You absolutely need a CEEform 16A 3-pin blue socket. This is the international standard for leisure vehicles and what you'll find at every campsite hook-up point in the UK and Europe. Don't be tempted by anything else.
- Mounting: You've got two main options:
- Recessed: This is the tidiest option. The socket sits flush with your van's bodywork, requiring a larger hole cut into the panel. It looks professional and minimises the risk of snagging. Most factory-built campervans use this style.
- Surface Mount: This type bolts directly onto the exterior panel. It's easier to install as it needs a smaller hole for the cable, but it protrudes more. It's often a good choice for DIYers who want to avoid complex bodywork.
- Weatherproofing: Your inlet must be fully weatherproof. Look for an IP (Ingress Protection) rating, ideally IP44 or higher, meaning it's protected against splashing water from any direction. It will have a spring-loaded cover to keep water and dirt out when not in use.
- Quality Construction: Choose a reputable brand. This socket will be exposed to the elements and frequent plugging/unplugging. Cheap plastic can crack or become brittle over time.
Installation Tips:
Cutting a hole in your van is always a nerve-wracking moment. Measure twice, cut once. Use a holesaw for a clean circular cut, then tidy up with a jigsaw if needed for recessed models. Seal around the edges thoroughly with a high-quality sealant like Sikaflex to prevent water ingress. Connect your 230V mains cable directly to the terminals inside – Live (brown), Neutral (blue), and Earth (green/yellow).
Price Range:
A good quality external inlet socket will typically set you back between £15 and £40. Recessed options are often at the higher end.
2. The Hook-Up Cable
This is the lifeline that connects your van's inlet socket to the campsite's hook-up post. Your choice here impacts safety, convenience, and longevity.
What to Look For:
- Standard: The cable needs CEEform 16A 3-pin blue plugs on both ends. One end plugs into your van, the other into the campsite post.
- Cable Type: It must be a heavy-duty, outdoor-rated flexible cable. The minimum cross-sectional area for a 16A supply is 2.5mm² (three cores: Live, Neutral, Earth). Don't use standard domestic extension lead cable; it’s not designed for the rigours of outdoor use or high current over distance.
- Length: This is crucial. Campsite hook-up posts aren't always right next to your pitch.
- 10-metre: Often sufficient for many pitches, but can sometimes be a stretch.
- 15-metre: A good all-rounder, offering a bit more flexibility. This is often the sweet spot for most users.
- 25-metre: Provides maximum flexibility for those tricky pitches or when you want to park further away. However, it's bulkier to store and can introduce a slight voltage drop over longer distances, though typically negligible for 16A.
- Recommendation: A 15-metre cable is a solid choice for most. You can always carry a short extension in a pinch if you really need more, but longer is generally better than too short.
- Colour: Most hook-up cables are bright orange, yellow, or blue. This isn't just a fashion statement; it's a safety feature. High visibility prevents people tripping over it or you accidentally driving over it.
- Storage: Consider how you'll store it. Coiling it neatly is key to preventing kinks and damage. Some come with a carry bag.
Safety and Usage:
Always uncoil the entire cable when in use, even if you only need a short length. Coiling creates an inductive loop, which can cause the cable to overheat, especially under heavy load. Inspect your cable regularly for any cuts, fraying, or damage to the plugs. Damaged cables are a serious electrical hazard.
Price Range:
Expect to pay anywhere from £30 for a 10-metre cable to £80 for a 25-metre, high-quality cable. Don't buy the cheapest you can find; a good cable is an investment in safety.
3. The Consumer Unit (RCD & MCBs)
This is the heart of your van's 230V system, your essential electrical guardian. It's where the mains power enters your van's internal wiring and is distributed safely to your sockets and appliances. Without this, your system is dangerously unprotected.
What it Does:
- RCD (Residual Current Device): This is your shock protection. An RCD constantly monitors the current flowing in the Live and Neutral wires. If it detects even a tiny imbalance (meaning current is leaking somewhere, perhaps through you!), it trips almost instantly, cutting off the power. This is absolutely critical for personal safety.
- MCB (Miniature Circuit Breaker): These protect individual circuits from overcurrents (like plugging in too many high-power appliances) and short circuits. Each MCB has a specific current rating (e.g., 6A, 10A, 16A). If the current exceeds this rating, the MCB trips, preventing damage to your wiring or appliances and reducing fire risk.
Typical Setup for a Campervan:
A standard campervan consumer unit will often include:
- A main 16A RCD that protects the entire 230V system.
- A 10A MCB for your internal 230V sockets. This allows you to run a couple of medium-power appliances (e.g., a laptop charger and a small heater, but probably not a kettle and a hair dryer simultaneously).
- A 6A MCB for any fixed, lower-power appliances that run directly from mains, such as a battery charger, a 230V compressor fridge, or a 230V water heater.
- Some larger units might have an additional 16A MCB if you plan to run a high-power fixed appliance like a dedicated mains immersion heater.
Installation and Location:
Mount your consumer unit in a dry, easily accessible location inside the van. You need to be able to reset it quickly if it trips. Ensure all wiring connections within the unit are secure and correctly terminated. The Earth connection from the external inlet must connect to the main Earth bar in the consumer unit, and from there, to all your internal 230V sockets and any metal-cased appliances. Your van's chassis should also be earthed to this point.
Price Range:
A good quality, pre-wired campervan consumer unit with an RCD and a couple of MCBs will cost between £60 and £150. Brands like Sargent or CBE offer excellent integrated solutions, though a standard domestic consumer unit can also be adapted if you know what you're doing.
4. Internal Sockets & Wiring
Once power passes through your consumer unit, it's distributed to your internal sockets and fixed appliances.
Internal Sockets:
- Standard: Use standard UK 3-pin 13A sockets. Choose robust, good quality sockets that can withstand vibration.
- Placement: Think about your layout. Where will you boil a kettle? Charge your phone? Plug in a laptop? Common places include near the kitchen counter, by the seating area, and near the bed. Aim for at least two, but three or four is often more practical.
- USB Integration: Many modern sockets now come with integrated USB charging points. These are incredibly handy, freeing up your 3-pin sockets for other uses.
Wiring:
- Cable Type: All internal 230V wiring must be 3-core insulated cable: Live (brown), Neutral (blue), and Earth (green/yellow).
- For ring circuits feeding multiple sockets or for high-power fixed appliances, use 2.5mm² cable.
- For individual, lower-power fixed appliances (like a battery charger), 1.5mm² cable might be acceptable, but check the appliance's requirements.
- Protection: All wiring must be adequately protected within the van. Run cables through conduit, trunking, or behind panels to prevent damage from rubbing, crushing, or accidental piercing.
- Earthing: Every single 230V metal-cased appliance and the Earth terminal of every 230V socket must be connected to the Earth bar in your consumer unit. The consumer unit's Earth bar must then be connected to your van's chassis. This ensures that if a Live wire accidentally touches a metal casing, the current flows to Earth and trips the RCD or MCB, preventing a shock.
Price Range:
Individual good quality UK 3-pin sockets (with or without USB) typically cost £5-£15 each. Wiring costs around £1-£2 per metre.
5. Integrating with Your 12V System (Optional but Highly Recommended)
While EHU provides 230V AC, it can also significantly enhance your 12V DC system. This is where smart design really pays off.
Battery Charger:
This is the most common and beneficial integration. A dedicated 230V-to-12V battery charger connects to your 230V mains supply (usually via a dedicated 6A MCB in your consumer unit) and converts that power into a steady, multi-stage charge for your leisure batteries.
- Benefits: Much faster and more efficient charging than solar alone, especially in winter or when parked up for extended periods. It keeps your batteries topped up and healthy.
- Types: Look for 'smart' or 'multi-stage' chargers that optimise charging for different battery types (lead-acid, AGM, lithium) and states of charge.
- Price Range: A decent smart charger can range from £80 to £300, depending on output current (e.g., 10A, 20A, 30A) and features.
Auto-Switching Appliances:
Some fridges, water heaters, and even space heaters are designed to run on multiple power sources. For example, a "3-way" fridge might run on 12V (when driving), gas, or 230V mains. When you hook up to EHU, these appliances can automatically switch to 230V, saving your 12V battery power for other uses. This is incredibly efficient.
Inverter Confusion:
A common misunderstanding is thinking you need an inverter with EHU. You absolutely do not. An inverter converts 12V DC from your leisure batteries into 230V AC. When you're on EHU, you already have 230V AC power directly from the campsite post. An inverter is for off-grid 230V power, not for EHU. Don't waste money on an inverter if your primary goal is mains power when hooked up.
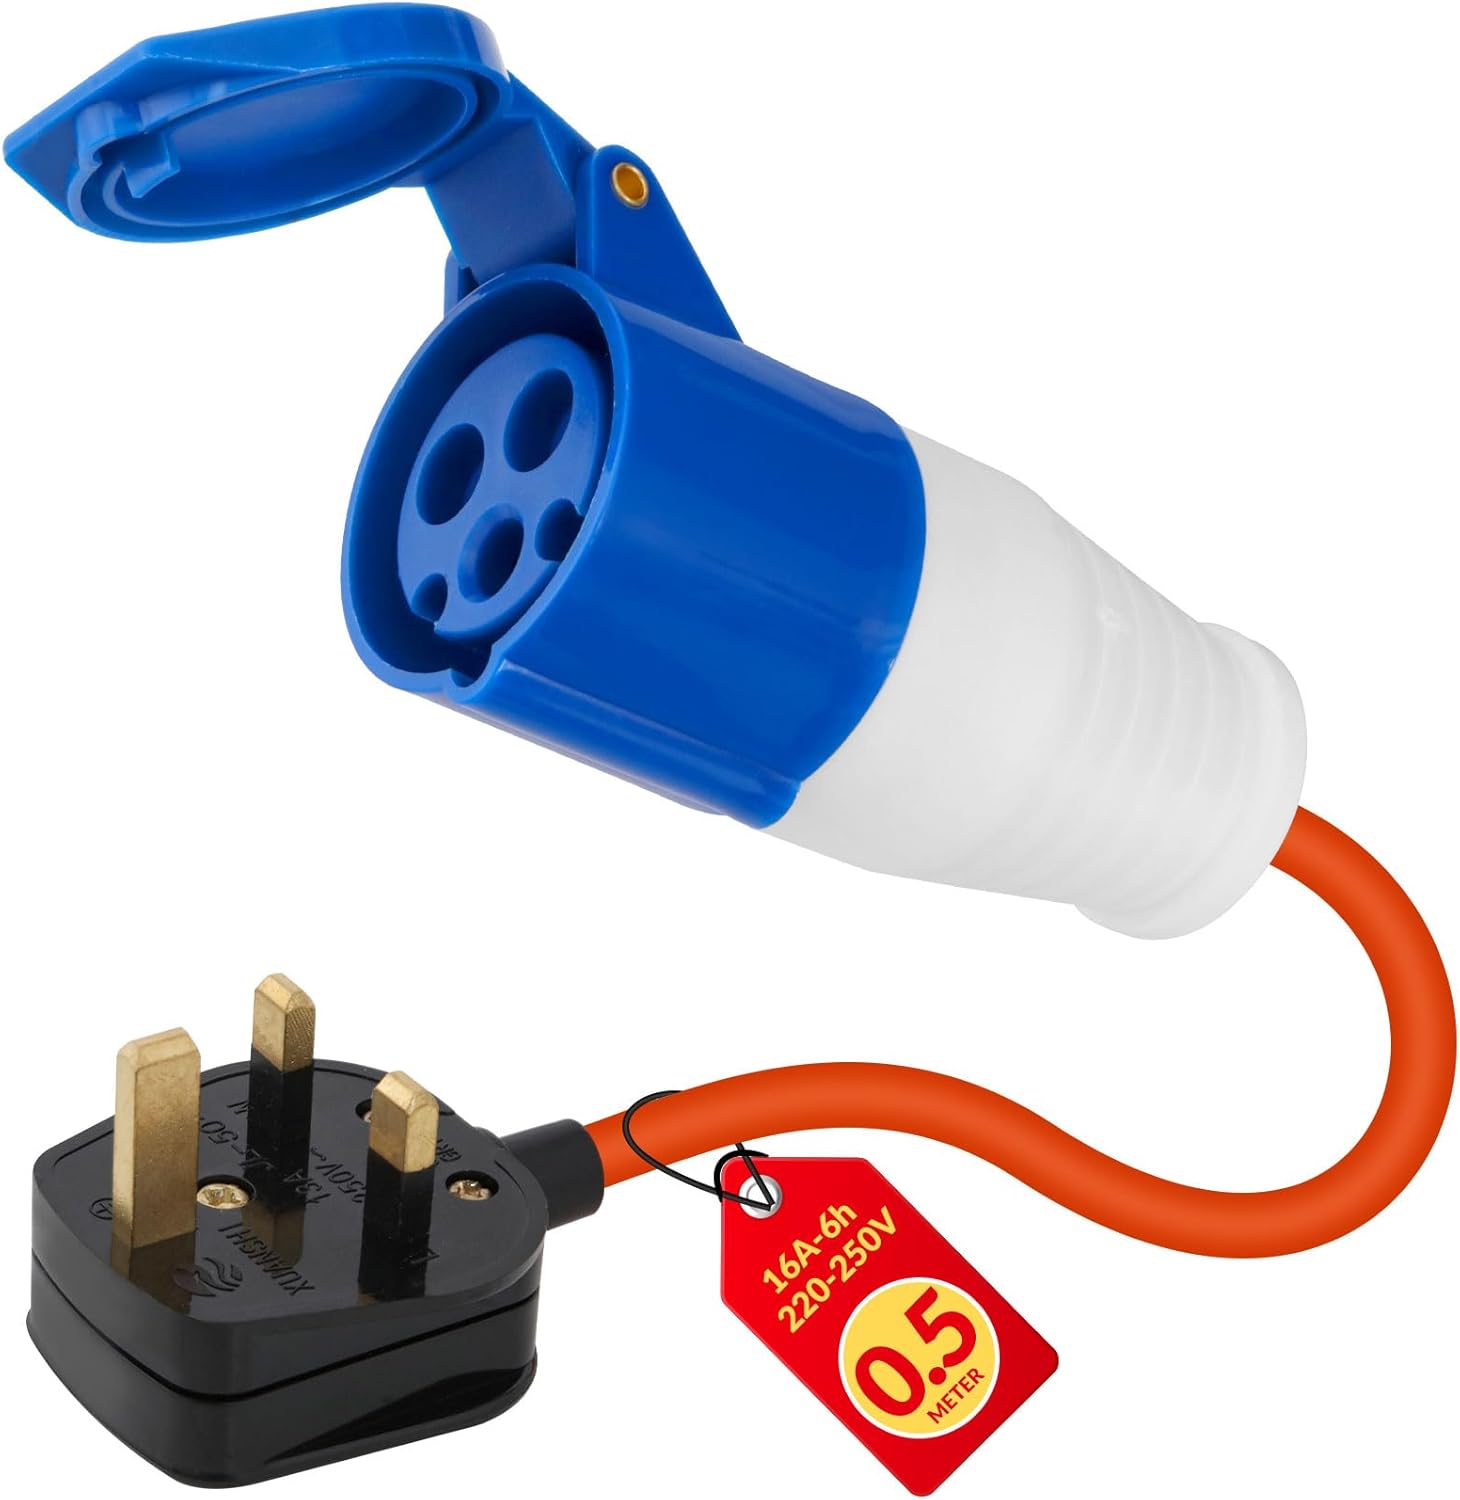
The VELPAX 16A to 13A UK Hook Up Adapter Lead - £8.99
Now, let's talk about a specific, very handy little gadget that every campervan owner should have in their toolbox: the VELPAX 16A to 13A UK Hook Up Adapter Lead. This isn't a core component of your permanent EHU system, but it's an incredibly useful accessory.
What it Is:
This adapter lead has a standard CEEform 16A blue plug on one end (the same one that plugs into your campervan's hook-up cable) and a standard UK 3-pin 13A domestic plug on the other. It typically has a short length of heavy-duty cable in between.
What it Does:
The VELPAX adapter allows you to connect your campervan's standard 16A hook-up cable to a regular UK 13A domestic socket.
When You Need It:
- Charging at Home: This is its primary use. You can plug your van into a domestic socket in your garage, on your driveway, or even from your house if you have an appropriate outdoor socket. This is perfect for keeping your leisure batteries topped up between trips or before you head out.
- Pre-Trip Testing: Before you hit the road, you can use this adapter to test your entire 230V system at home, ensuring everything works correctly and no RCDs trip.
- Temporary Power: For very temporary, low-power needs in a domestic setting (e.g., running a small fan while packing).
Crucial Safety Considerations (READ THIS!):
- DO NOT Use it the Other Way Around: This adapter is for connecting your 16A van system to a 13A domestic supply. It is NEVER for connecting a domestic 13A extension lead to a 16A campsite post. That's a recipe for disaster, as domestic extension leads are not designed for outdoor use, high currents, or the same level of weather protection.
- RCD Protection at Home: When using this adapter at home, always ensure the domestic socket you're plugging into is RCD protected. If it's an outdoor socket, it usually will be. If using an indoor socket, consider plugging it into a separate RCD plug adapter for extra peace of mind. Your van's internal RCD offers protection, but a secondary layer at the source is always safer.
- Current Limits: A standard UK domestic socket is rated for 13A. Your van's EHU system might be designed for 16A. This adapter limits your available current to 13A (or less, if the domestic circuit fuse is lower). Don't try to run high-drain appliances simultaneously when hooked up this way. Your 10A MCB for sockets in the van will likely trip before the 13A domestic fuse, which is what it's supposed to do.
- Temporary Use: This adapter is for temporary, supervised use. It's not designed for long-term outdoor connection or to power high-drain appliances continuously.
Why it's a Smart Buy:
For just £8.99, the VELPAX 16A to 13A adapter is an inexpensive, invaluable tool for convenience and pre-trip preparation. It saves you from needing a dedicated outdoor 16A socket at home and makes charging your van simple. Just remember its limitations and use it safely.
Choosing Your EHU Setup: DIY vs. Professional Installation
Deciding whether to tackle the EHU installation yourself or hire a professional is a big decision. Both have their pros and cons.
DIY Installation
Pros:
- Cost Savings: This is the biggest draw. You save significantly on labour costs.
- Learning Experience: You'll gain a deep understanding of your van's electrical system, which is invaluable for troubleshooting later.
- Satisfaction: There's immense pride in knowing you built it yourself.
- Customisation: You have full control over component choices and layout.
Cons:
- Safety Risks: Incorrectly wired 230V mains electricity is extremely dangerous. It can cause electric shock, fire, and damage to appliances.
- Requires Knowledge: You need a solid understanding of electrical principles, wiring regulations (BS 7671 in the UK), and proper installation techniques. You must understand earthing, fusing, RCD operation, and cable sizing.
- Time Consuming: It takes time to research, plan, install, and test.
- Specialised Tools: You'll need crimpers, wire strippers, a multimeter, and potentially an insulation resistance tester.
Recommendation for DIYers:
If you have prior electrical experience and are confident in your abilities, go for it. However, if you're unsure, even slightly, consider getting your work inspected and tested by a qualified electrician. They can issue an Electrical Installation Condition Report (EICR) to confirm safety and compliance, which can be useful for insurance purposes. Don't guess with mains electricity.
Professional Installation
Pros:
- Safety and Compliance: A qualified auto electrician or campervan converter will provide an electrical systems installation to relevant standards, ensuring it's safe and compliant.
- Peace of Mind: You know the job is done correctly, reducing the risk of faults or hazards.
- Warranty: Professional installations often come with a warranty on parts and labour.
- Insurance: Some insurers prefer or require professionally installed electrical systems.
- Expert Advice: They can offer guidance on the best components and layout for your specific needs.
Cons:
- Cost: This is the main disadvantage. Professional labour adds significantly to the overall price. Installation alone can cost £300-£800, on top of parts.
- Less Control: You might have less direct input on exact component brands or minor layout details.
When to Choose Professional:
If you lack electrical experience, are short on time, or simply want the ultimate peace of mind, hiring a professional is the smart choice. It's an investment in your safety and the longevity of your van.
Safety First: Absolutely Critical for EHU
We cannot overstate this: safety with 230V mains electricity is paramount. A mistake can be fatal. Follow these rules without exception.
- RCD Testing: Your consumer unit has an RCD test button. Press it regularly (e.g., once a month or before every major trip). The RCD should trip instantly. If it doesn't, do not use your EHU system and get it checked immediately.
- Cable Inspection: Before every use, thoroughly inspect your hook-up cable for any cuts, abrasions, exposed wires, or damage to the plugs. Check for bent or corroded pins. A damaged cable is a serious hazard.
- Water and Electricity Don't Mix: Ensure all connections (inlet socket, hook-up cable plugs) are kept dry. Never plug in or unplug with wet hands or if standing in water.
- Uncoil the Cable: Always completely unroll your hook-up cable when in use. Coiled cables can overheat, especially under heavy load, leading to fire risk.
- Avoid Overloading: Be mindful of what you plug in. Campsite posts are typically 16A, but some older or smaller sites might be 10A or even 6A. Know your limits. Running a kettle (2000W / ~8.7A) and a hairdryer (1500W / ~6.5A) simultaneously could easily trip a 16A supply, let alone a 10A one.
- Proper Earthing: Your entire 230V system, including the van's metal chassis, must be properly earthed back to the consumer unit's Earth bar. This is your primary protection against electric shock.
- Don't Modify: Never modify hook-up cables, plugs, or adapters. Use them as intended.
- Domestic Extension Leads: Never use standard domestic extension leads outdoors, especially not as a substitute for a proper hook-up cable. They are not designed for the weather, current, or robust nature required for campervan use.
- Children and Pets: Keep children and pets away from electrical connections and open sockets.
Common Pitfalls and Troubleshooting
Even with a perfectly installed system, issues can arise. Here are some common problems and how to tackle them:
- No Power at the Post:
- Check the campsite breaker: Many posts have their own trip switch. It might have tripped, or a previous user might have left it off.
- Check the cable: Is it fully pushed in at both ends?
- Check your van's RCD/MCBs: Has anything tripped inside your van?
- Van's RCD Keeps Tripping:
- This is usually a sign of an earth leakage fault.
- Unplug everything: Disconnect all appliances from your van's 230V sockets. Reset the RCD. If it holds, plug appliances back in one by one until it trips again. The last appliance plugged in is likely the culprit.
- Check for water ingress: Has rain got into your inlet socket or external connections?
- Faulty appliance: An internal fault in an appliance can cause leakage.
- Wiring fault: Less common in a well-installed system, but possible. If the RCD trips with nothing plugged in, you have an internal wiring issue.
- MCB Keeps Tripping:
- Overloaded circuit: You've plugged in too many high-power appliances on that circuit. Unplug some items.
- Short circuit: A fault in an appliance or wiring can cause a short. Try the unplug-and-test method.
- Low Voltage:
- Rare in the UK, but can happen on very long hook-up cables or if the campsite supply is generally poor/overloaded. You might notice appliances running slowly or heating elements not getting as hot.
- Bent Pins: Never force a plug into a socket. If a pin is bent, it's safer to replace the plug or cable.
- Driving Off with Cable Attached: It happens to the best of us! Develop a routine: always disconnect EHU before packing up anything else.
Estimated Cost Breakdown for an EHU System (DIY Parts)
Here's a rough idea of what you might spend on parts for a DIY EHU installation in your campervan. Remember, these are estimates, and prices can vary based on brand and features.
- External Inlet Socket (16A CEEform): £25
- Hook-Up Cable (15m, 2.5mm²): £50
- Campervan Consumer Unit (RCD + 2x MCBs): £90
- Internal UK 3-pin Sockets (x3, with USB): £45 (£15 each)
- 230V Wiring (2.5mm² & 1.5mm²), Conduit/Trunking, Junction Boxes, Terminals: £60
- Smart 230V-to-12V Battery Charger (20A): £150
- VELPAX 16A to 13A UK Hook Up Adapter Lead: £8.99
Total Estimated DIY Parts Cost: Approximately £428.99
Professional Installation Costs: If you opt for professional installation, expect the parts cost plus labour, which can add anywhere from £300 to £800+, bringing the total to £700 - £1200+ depending on the complexity and the professional's rates.
Final Thoughts and Recommendations
Getting your Electrical Hook Up right is a foundational step in creating a comfortable and safe campervan experience. It’s not the flashiest part of the build, but it's arguably one of the most important.
- Don't Skimp on Safety: This is non-negotiable. Always use high-quality, correctly rated components. If you're doing it yourself, educate yourself thoroughly or get it checked by a professional.
- Plan Your Layout: Think about where you'll need power. A well-placed socket makes a huge difference to daily life in the van.
- Invest in a Good Cable: Your hook-up cable is your connection to the outside world. A robust, visible, and appropriately long cable will save you hassle and ensure safety.
- The VELPAX Adapter is a Must-Have: For its low price, the VELPAX 16A to 13A adapter is incredibly useful for home charging and testing. Just understand its specific purpose and use it responsibly.
- Integrate Smartly: A good 230V-to-12V battery charger is a game-changer for keeping your leisure batteries topped up and healthy, maximising your off-grid time even after a night on hook-up.
With a well-designed and safely installed EHU system, you unlock a whole new level of convenience and comfort in your campervan. Enjoy those hot showers, freshly brewed coffees, and fully charged devices, knowing you've built a solid, safe electrical foundation for your adventures. Happy camping!